Web
How to Preview Ghost's Drafts in GatsbyJS (Part 2)
By this point, you should have Ghost and Gatsby up and running and talking to each other. If that’s not the case, please, make sure to check out the previous part of the tutorial. Otherwise, buckle up! You’re about to implement the heart of this guide: the preview page.
Tutorial outline:
- Bootstrap the project
- Implement the preview page (you are here 📍)
- Get ready for production
In case you didn’t know, Ghost already has a built-in preview. It’s available from the post editor, under Settings > Preview. Unfortunately, this sneak peek uses the native Ghost theme instead of Gatsby, which is undesirable. So, the first step is to convoy the traffic to a Gatsby page instead.
Seamless Redirects
Whereas other CMSs might rely on the web-server configuration to achieve the same result, Ghost has a handy, native way to define redirects. It consists of a single JSON file, called redirects.json, that you should populate as follows.
[
	{
		"from": "^/p/([^/]+)",
		"to": "http://127.0.0.1:8000/preview/$1/",
		"permanent": false
	}
]
The above from regex will match any Ghost path that starts with /p/, followed by one or more occurrences of any character but the forward slash. It also groups this second portion of the path and replaces the $1 token of the to string with what it scraped. Then, it redirects the visitors to the newly computed address.
Save this JSON file into your .ghost/data/ project directory. This location maps to the /var/lib/ghost/content/data folder of the docker container you set up last time. Once you’ve done that, make sure to restart your services with docker-compose restart.
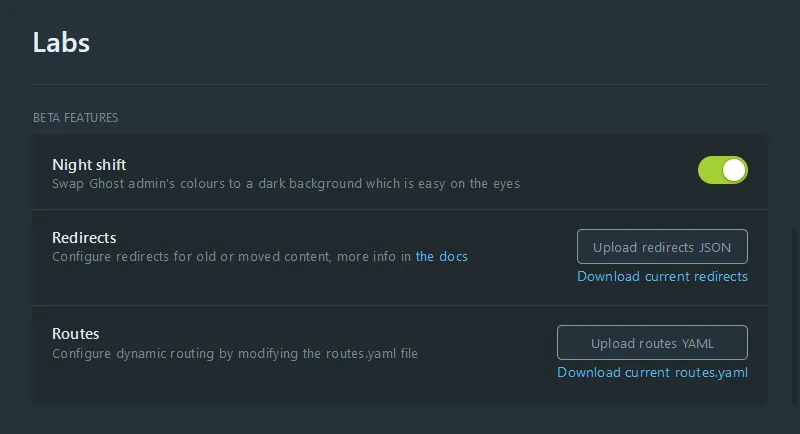
Alternatively, head to the Settings > Labs view and upload your file through the interface.
To test it out, navigate to http://localhost:3001/p/tutorial/. If everything went smoothly, it should redirect you to http://127.0.0.1:8000/preview/tutorial/.
The Preview Page
To create a new page in Gatsby, you can leverage the already included gatsby-plugin-page-creator plugin, which, by default, automatically converts any component in src/pages to a page. However, the goal is not only to create a static asset but to serve multiple, dynamic URLs with the same base path.
The Gatsby contributors have already put together a throughout explanation on the topic. To stay practical, though, what you need to know is that we are using the @reach/router package to set up a bunch of client-only routes and that you’ll let gatsby-plugin-create-client-paths tell Gatsby how to handle them.
# From inside your project
npm i --save gatsby-plugin-create-client-paths
# @reach/router already ships with Gatsby
Once it’s installed, update your gatsby-config.js and add the following object to the list of exported plugins.
// ...
module.exports = {
	// ...
	plugins: [
		{
			resolve: `gatsby-plugin-create-client-paths`,
			options: { prefixes: [`/preview/*`] },
		},
		// ...
	],
};
Then, create a file into your src/pages folder, call it preview.js, and paste in this minimal proof of concept to verify it’s working.
import React from "react";
import PropTypes from "prop-types";
import { Router } from "@reach/router";

class PreviewPage extends React.Component {
	constructor(props) {
		super(props);
	}
	render() {
		return <h1>{this.props.uuid}</h1>;
	}
}

PreviewPage.propTypes = {
	uuid: PropTypes.string,
};

const Preview = () => (
	<Router>
		<PreviewPage path="/preview/:uuid" />
	</Router>
);

export default Preview;
Spin up your Gatsby development instance (gatsby develop) and navigate to http://localhost:8000/preview/Hello%20world. If everything went right, the well-known programmer test message should appear on the screen.
Fetch the Post
Now that you can read and use whatever gets passed through the path to the page, it’s time to use that information to query the Ghost’s Admin API and retrieve the draft’s content. First, install the JavaScript client.
npm i --save @tryghost/admin-apiTo be able to import it on a page (and, consequently, in a browser environment), add the following snippet to the gatsby-node.js file. This will tell Webpack not to try to bundle fs in the application code.
// ...
exports.onCreateWebpackConfig = ({ actions, getConfig }) => {
	const config = getConfig();
	config.node = { fs: `empty` };
	// This will completely replace the webpack config with the modified object.
	actions.replaceWebpackConfig(config);
};
Then, get back to the Settings > Integrations page of Ghost, open the custom integration we set up last time, and grab a copy of your integration API URL and admin key. Finally, update the PreviewPage component as shown below, and replace the <YOUR GATSBY ADMIN URL> and <YOUR GHOST ADMIN KEY> placeholders with your values.
// line 4
import GhostAdminAPI from "@tryghost/admin-api";

import Post from "../templates/post";

const api = new GhostAdminAPI({
	url: `<YOUR GHOST ADMIN URL>`,
	key: `<YOUR GHOST ADMIN KEY>`,
	version: `v3`,
});

class PreviewPage extends React.Component {
	constructor(props) {
		super(props);
		this.state = {
			post: null,
		};
	}
	async componentDidMount() {
		if (this.props.uuid) {
			// endpoints params
			const browseParams = {
				filter: `uuid:${this.props.uuid}`,
				formats: `html`,
			};

			// retrieve a brief list of posts and pages
			const post = (await api.posts.browse(browseParams))[0];

			if (post) {
				this.setState({ post });
			}
		}
	}
	render() {
		// when ghost answers back
		if (this.state.post !== null) {
			const data = {
				// match the expected structure
				ghostPost: {
					...this.state.post,
					published_at: new Date().toISOString(),
				},
			};
			const location = this.props.location;
			return <Post data={data} location={location} />;
		}
		return null;
	}
}

PreviewPage.propTypes = {
	uuid: PropTypes.string,
	location: PropTypes.object, // passed down by @reach/router
};

// ...
Once you’re set, stop and restart the Gatsby development server, create a new Ghost post, give it a title, write some gibberish, and open its preview. Ta-da!

What about pages?
Unfortunately, Ghost posts and pages aren’t accessible from the same endpoint. However, with a bit of functional programming and the right data structure, you can avoid separate paths of code and keep everything neat and clean.
// line 7
import Page from "../templates/page";

// ...

// line 15
const docTypes = [
	{
		endpoint: api.posts,
		component: Post,
	},
	{
		endpoint: api.pages,
		component: Page,
	},
];

class PreviewPage extends React.Component {
	constructor(props) {
		super(props);
		this.state = {
			document: null,
			type: null,
		};
	}
	async componentDidMount() {
		if (this.props.uuid) {
			// endpoints params
			const browseParams = {
				filter: `uuid:${this.props.uuid}`,
				formats: `html`,
			};

			// retrieve a brief list of posts and pages
			const endpoints = docTypes.map((docType) => docType.endpoint);
			const requests = endpoints.map((endpoint) =>
				endpoint.browse(browseParams),
			);
			const results = (await Promise.all(requests)).map(
				(resultsList) => resultsList[0],
			);

			const index = results.findIndex(Boolean);

			if (index != -1) {
				const document = results[index];
				const type = docTypes[index];
				this.setState({ document, type });
			}
		}
	}
	render() {
		// when ghost answers back
		if (this.state.document !== null) {
			const data = {
				// match the expected structure
				ghostPost: {
					...this.state.document,
					published_at: new Date().toISOString(),
				},
				ghostPage: this.state.document,
			};
			const location = this.props.location;
			const DocElement = this.state.type.component;
			return <DocElement data={data} location={location} />;
		}
		return null;
	}
}

// ...
The full code is available at https://github.com/fedetibaldo/how-to-preview-ghosts-drafts-in-gatsbyjs/blob/part-2/src/pages/preview.js.
Conclusion
Well done! You’ve just implemented a seamless preview experience with Ghost and GatsbyJS. Next time, you’ll get to know how to optimize it for the production environment, but for now, chill and have a margarita; you earned it!
Revisions
09-16-2020 | Improved post search. Thanks @vikaspotluri. Original comment.
01-13-2021 | Removed obsolete paragraph. It may or may not be related to my past PC resets :shrug: